
How To Create and Use Concept Maps
See also: Decision MakingTo break a big idea into smaller, easier-to-understand parts, concept maps should be used. A concept map is a diagram that can be used to find interconnected concepts logically. To create a concept map, you need the main idea that will branch out into other topics or aspects that relate to the bigger concept.
Concept maps have been used for decades as a brainstorming technique, specifically in schools. They can be a great way to get a visual perspective of how different content links to each other.
To learn how to create and use concept maps, read on.
Using Brainstorming Tools to Decide the Drawing Medium and Main Topic
The drawing medium refers to the way that you want to see the concept map and information.
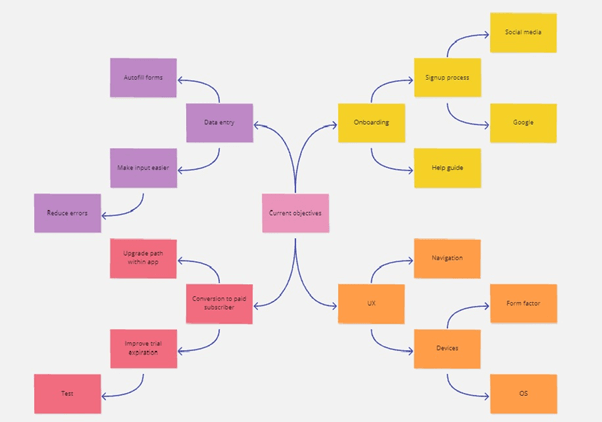
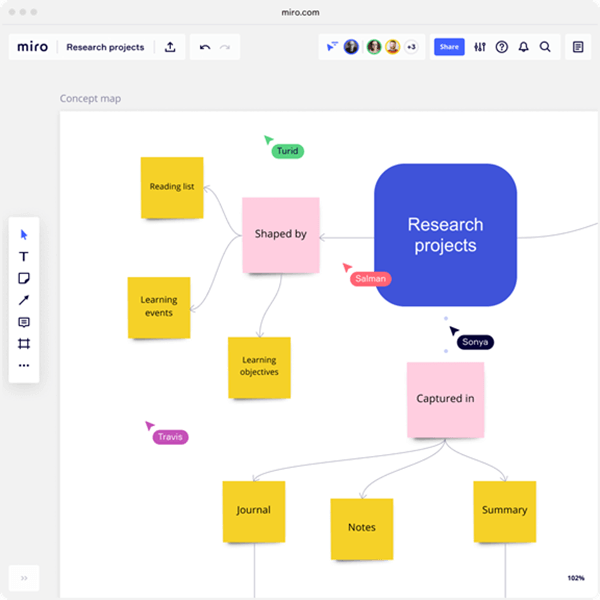
There are online brainstorming tools that can help you design and organize a concept map on a computer, but you may want to start with a large piece of paper and pen. Start by identifying the main concept. Generally, this is what you will write in the center of the paper. It can be a question or a phrase that summarizes the main idea. It can also be used to identify a gap in a particular topic.
The main concept is where the rest of the map will stem from. It needs to be a concept that will have enough nodes that can be placed around the main idea. Concept maps are ideal for more complicated topics that need to be understood better. There should be sub-topics or areas that relate to the main idea.
Specify Key Concepts
With the main concept in mind, now take a second piece of paper and write down every sub-category you can think of. An effective main concept will give you anywhere from 15 to 20 sub-topics that are associated. This is how you will know you have chosen a good main concept to branch out from. Next to each sub-concept, define or summarize the point and list them from the most to the least relevant.
The next step is probably the hardest, but it will get easier if you pick sub-concepts that have the most to be said about. Pick 10 of the most important subcategories you have written down, and identify how they relate to the other 10 or so more minor topics. One way to do this is to see which concepts have definitions with similar words or phrases that you wrote down in the previous step.
Linking Elements Together
From the main and sub-topics you have identified, you now need to put them into a comprehensive order that makes sense. Decide on the shapes you want to use, with a different one for each part of the hierarchy created previously. This step is where brainstorming tools can be effective to make your concept map look more professional. For example, it can be a triangle for the main concept, squares for the next set of sub-concepts with the most related to the main one, and then circles for the less relevant points that were lower on the hierarchy.
Start to conceptualize the visual map as a preliminary step. Will you be using arrows or lines to denote relationships between specific concepts, and how will you define the relationship? You do this because when you start to write or summarize the main topic, you may not remember how you related each concept to one another. To assist with this, each time you link two concepts together or to the main topic, write a short definition or a few keywords on the connecting line or arrow. These will be your linking words so that you can better formulate how everything fits together in the larger picture. Next, with a different color or line type, cross-link as many concepts together as you can. Be sure to only link ideas that are specific to each other. If a concept doesn’t seem to have any relation, then it should be removed completely.
Arrange the Concept Map
Now that you have a clear image and idea in mind as to how the concepts are related to one another, you can start to put the pieces together. There are many ways to design a concept map visually, as long as it can be easily understood at the end. If you have a lot of sub-concepts, you may want to put your main one as the top image, with each sub-category following underneath in sequential order.
Remember to stick to the same shapes and colors for concepts that are more specific to each other. This way you can identify how many minor concepts relate to the bigger ones and then to the main concept from which your map stems. Type out every single one of the 15 to 20 sub-concepts you defined earlier and place them in the corresponding areas with lines or arrows between each. You may also have additional categories that relate to one of the smaller ideas but not to the main point. This is a separate connection that you need to identify with another color or shape.
Refine the Details
As you work through connecting each concept, you may see something that doesn’t quite fit, or where two minor concepts relate better than before. This step is to refine all of those details. Remember to put keywords and phrases on the connecting arrows or lines and ask yourself the following questions. How does every element fit together? Do they fit logically and respectively? Are there any ideas that would be better positioned somewhere else? Lastly, ask yourself if you can redefine each relationship with better linking words.
These questions are meant to stimulate your thought process and help you understand the main concept better. You may even identify additional concepts that can be added to the overall theme of the concept map, and this all adds to the quality of the final product.
An effective and well-designed concept map will allow you to gain more knowledge about the main topic, answer a specific question, and help you to organize your thoughts thoroughly.
About the Author
Boris Dzhingarov graduated UNWE with major Marketing. He is the CEO of a brand mentioning advertising agency ESBO ltd.
Continue to:
Brainstorming Techniques
Creative Thinking